28 November 2010

feels like the...

h o l i d a y s !


I love the scent of a Christmas tree in the house; it brings back all the happy feelings of anticipation and childhood excitement for the holidays. My boys helped me decorate the tree. Every ornament has a story, which is part of the fun when we bring them out each year.


I also decided to try out a snowflake doily craft from the happy home blog. Her photos are cuter but I'm pleased with how they dress up my plain chimney. Next I may try to make a button wreath, or perhaps one from the pages of a book.


Hope all my U.S. friends had a happy Thanksgiving and I wish everyone the happiest of holidays, whichever ones you may celebrate! :)

07 November 2010

sketchbook project progress ~ {part 2}

I've got a title page, now ~ an imaginary road sign on an imaginary road in the Santa Cruz mountains.  I would like to neaten up the lettering with some white ink but will have to go buy some first.  Since I used watercolor on this spread, the paper is now kind of wrinkly and I'll be challenged by a dark spot or two on the next page where the color went through. 

I haven't been working on my Sketchbook Project nearly enough.  So many pages to fill and so little time!  Must resolve to do much more this month.

I'm very happy that my new twitter friend, Juriko, has also signed up for the Sketchbook Project after reading about it here on this blog.  When the tour comes to town, I'm definitely going to check hers out.  I've just been working so sporadically that I hope my sketchbook will be there to join hers.  I had better run off and get to work!

28 October 2010

don't spoil your dinner!


I was in a bit of a long meeting this morning.  My hand began doodling of its own accord and this carrot mama began chastising her chocolate-eating boy in my notebook.  I liked her hairdo ~ what else can you do with long, fluffy stalks of green but a stylish updo?

22 October 2010

design evening

Went to a talk this evening about fonts & music, and saw my design professor from two years ago.   It was so nice to see him again; made me want to take another class.  I learned that he had put one of my projects on display in a small exhibit in the design center, so I popped down to see it and to admire the other selected works ~ several of which I liked very much.  They were all self-portraits.  This was mine: 


As I recall, in that project we needed to create a self-portrait in Photoshop, also utilizing scanned physical objects.  I used pieces of my paintings along with some scanned objects from my childhood and a photo here and there.   When I look at it now, there are a few things I would clean up were I to do it again, but overall I'm still fond of it.

21 October 2010

✿♥♡❀ L♡VE ❀♡♥✿

My sister Tami and her boyfriend Paul recently announced their engagement!  I'm so joyful and excited for them! 

But they're not nearby for me to hug and smother with congratulations {as they're enjoying a romantic Engagement Vacation} ~ so I channeled my enthusiasm into a little sketch of them instead.

Congratulations Tami & Paul!!

  ✿♥♡❀ L♡VE ❀♡♥✿

I'll fix it up and color it in Photoshop, but this is the first sketch.  

I'm so happy for their happiness!!

20 October 2010

the forest

Got my sketchpad and pencil...

 I went for a hike at Mt. Madonna with my sister, her boyfriend and my mum.  As we walked along, I sketched material to refer to for my Sketchbook Project.   I had already been hiking there this summer and found so much inspiration for a little sketch story.  Giant hollow logs, clusters of graceful fungi, wild huckleberries, steep trails and tall, tall trees.

I was curious to know how many photos it would take to photograph the trees from top to bottom.  It took six:


We climbed to the ruins of Henry Miller's summer home.  This little photo was displayed there, but there are just some old stone walls and foundation pieces left, so it was impossible to figure out exactly how the house had been situated.  We tried to picture the hillsides with forests cleared, providing views from Santa Cruz to Santa Clara, and what life must have been like for such a wealthy landowner and his family.


One interesting thing we noted was that the foundation under the mess hall seemed to be hollow underneath.  Perhaps I'll imagine and draw what's under there in my Sketchbook Project...

At the end of our hike, after visiting the pens of white deer, we were heading to the car when we were invited to join the celebration party of a wedding.  The couple was from Monterey and I believe the husband was a marine biologist.

Champagne and sangria with the groom's work colleague
(in amazing, colorful dress!), my sister and her bf.

Sangria and wedding revelry were a charming and unexpected way to end off our hike.  Perhaps I shall find a way to include all of those elements in my sketchbook.  It was a good day of research, nature, family and inspiration. Happy day!

09 October 2010

jerry

The ground has been parched as summer has suddenly returned upon us.  I went out to water the garden and who did I scare out of the flowers but Jerry, the praying mantis. 


Jerry had not done any modeling before, but turned out to be a natural.  I offered him/her a part in my sketchbook project and we shot a number of different poses and angles for future reference.  Jerry has the amazing ability to move very, very slowly while hanging on to smooth, impossibly vertical surfaces with tiny feet that don't even have gripping toes.


Performing acrobatics on the manifold, Jerry told me the critter that had nibbled the edges of all those leaves was now "handled".  I didn't ask any further questions, but I did recall that I used to hear a cricket in the bush and hadn't heard its song for a couple evenings.


We hung out until Jerry began to look off into the distance, dreaming of greater things.  I guess that's how it is when one befriends a praying mantis.

03 October 2010

sketchbook project progress ~ {part 1}

 A mundane and moody beginning

Here we are with the first pages of my sketchbook for the Sketchbook Project.  My, my ~ it's really taking me a long time to get moving on this. 

This is a view of Highway 17 heading south towards Santa Cruz.  My topic is Lights in the Distance.  The overall idea I have is to set the sketchbook here, in the Bay Area and follow a story of various lights appearing in the distance that bring other characters with stories of their own.  That sounds kind of like aliens or something, but that's not what I mean ... you'll see.

Room in the sky to write something... possibly...

I started the sketchbook with the road heading south because I spent a lot of time there this summer ~ on the beaches and in the mountains ~ and found a lot of inspiration, especially in the redwood forests.  But for all the magic to happen with the lights, I wanted to set up a bit of a dull contrast with views of "normal life" first.  So, sorry if this is boring... at least it's deliberately so!


I plan to segue into more of a cartoon style very soon.  I haven't thought out the full story, thinking that the nature of a sketchbook should be less planned.  But I am looking forward to using different types of media or styles depending on what characters show up out of the lights.  I've encountered people in daily life sometimes and thought they should be characters in my sketchbook!

Reality before the surreality

I'm just using pencils to start with.  I'd like to paint but the pages are so painfully thin.  I think I'll either paste some pages together to fatten them up or paint on other paper and glue those in as I progress through the book, because I definitely would like more vivid color to show off the lights in the distance (and all that comes from them).  

Hope you'll keep me company and follow along on this project.

xo kimi

02 October 2010

emotion sketch ~ {sorrow}


I suppose I am fortunate in my life not to feel sorrowful very often.  Sadness is so overwhelming.  With full sorrow and grief, it seems that everything closes down to wrap around the pain of sadness and the outside world becomes faded and unreal.  For this reason, while painting this character, I let the features and background all blend together.

Later, playing with the image digitally, I darkened the colors overall.  The deeper tone suggested a moodier, deeper sorrow to me. 


Then I realized that in some states of grief, as a sense of apathy creeps in, there might not be much color at all.  So I tried one more, taking out the painful reds and muting the colors further.  I liked the way this one suggests darkness all around ~ reminding me that a true state of sorrow doesn't usually have room for light and hope.


It would be interesting to sketch the landscape around each of these degrees of sadness and find out what was happening to cause such a sad feeling. 

27 September 2010

first layers


I've started on two canvases using acrylics.  This is how far I've gotten so far ~ basically just the first layer down on each one.  The first one, above, is already quite busy but I'd like to give it something more to communicate.  The second one, below, still has endless possibilities...


We'll see where they take me!

19 September 2010

roadworks ~ {steamroller printing}


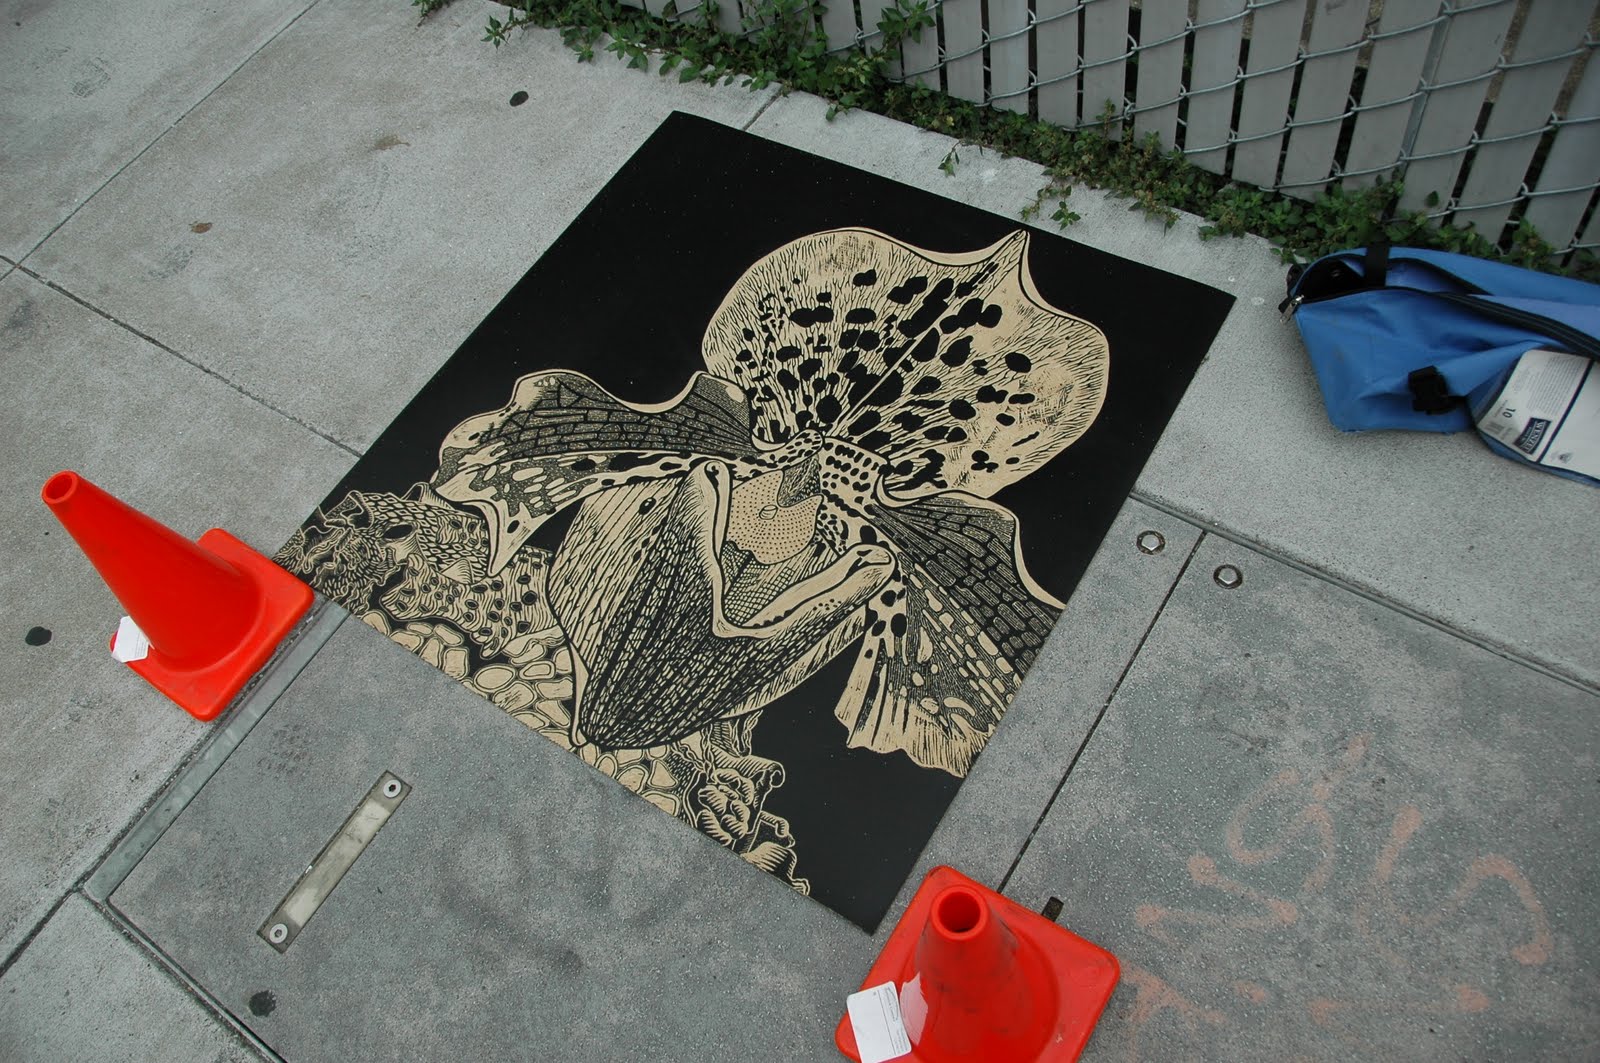
Had a wonderful day volunteering at Roadworks, a street fair put on by the San Francisco Center for the Book.  D. and I helped as "Inky Hands", mixing ink and preparing the lino cuts for the street-and-steamroller press.  This was our first time helping out, but now we know how to steamroll print (though we'd need some steamroller driving lessons first)!  Here's what we learned in ten easy steps:


1}  Carve a piece of linoleum.   This one is 3' x 3', which is slightly less than the width of the steamroller.  If you make a 1' x 1' plate then you can fit three across.

 2} Dampen your paper in advance.  At the fair, we used Rives BFK Heavyweight and Crane Lettra.  Both sides had been moistened with a spray bottle and sponge a day before.  Then the paper was sealed in plastic until it was time to print.


3} Mix the ink to the desired color.  In this case, for each batch I was told to use:  3/4 Daniel Smith Classic Lithographic Black #100 + 1/8 Warm Red + 1/8 Miracle Gel Reducer.  It was very similar to mixing oil colors, but much stickier and done in far greater volume.


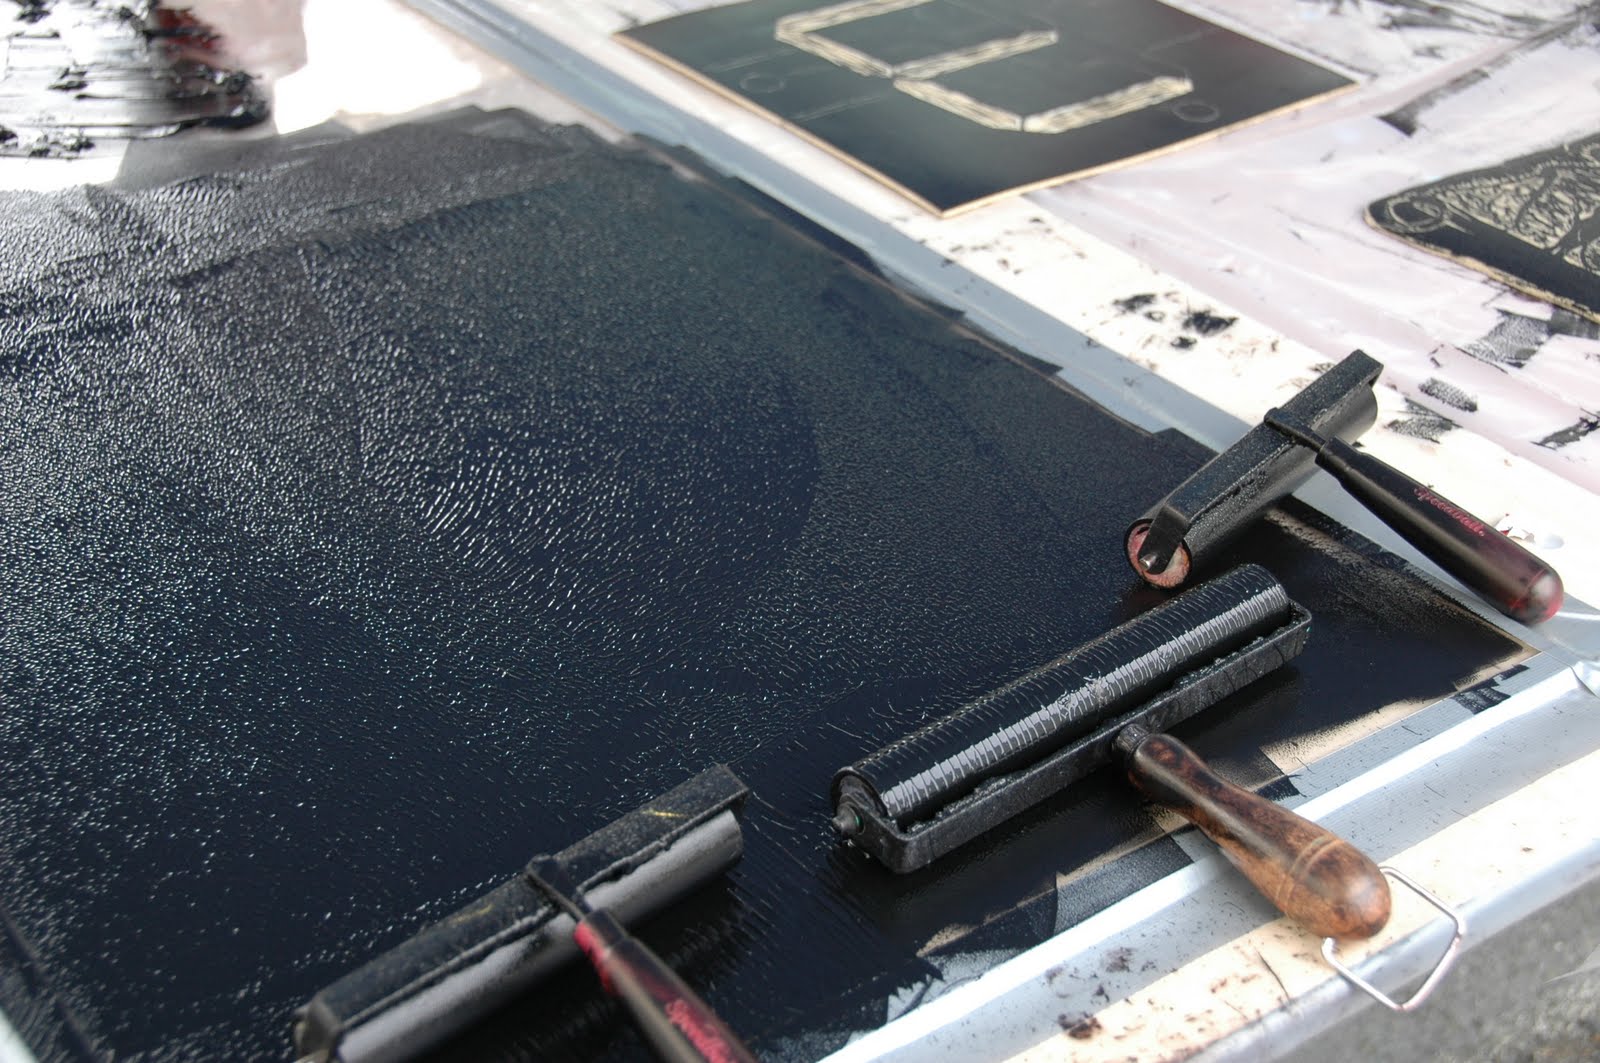
4} Spread the ink out evenly on a piece of mylar.  Here we have three brayers just for that purpose.  Lay it out nice and smooth so the brayers don't get blobby when you're charging up with ink.


5} Ink the linoleum using smooth strokes that lift up at the end.  Don't press too hard, or you'll make lines in the ink.  After smoothing it on in one direction, do it again at a 90 degree angle to your first coat.  When it looks velvety, it's done.  (All this technical info was courtesy of a kind fellow who came all the way from Phoenix for the fair.)


6} Layer the following on the street: 
  • a 4' x 4' piece of MDF
  • a giant piece of mylar (on which you can draw out where to place the linoleum)
  • the inked linoleum (face up, of course)
  • a piece of paper on top of each piece of linoleum
  • thin wool blankets
  • a thicker blanket
  • an even thicker blanket or shag carpet that covers everything


7} Roll firmly over your street press with your steamroller.


8}  Peel back the blankets and have someone with clean hands gently lift the paper off the print.  (It's ok to applaud and be excited when the prints are revealed.)  Inky handed people can then remove the linoleum from the press for re-inking as needed.


9} Set the prints out to dry.  Don't forget little weights if you're outdoors so the wind doesn't blow them away.


10} Decorate an old fence in your neighborhood with your fine work and sell to friends and passers by!

18 September 2010

new life


A few of my friends have recently had new babies, so today I used rice paper and watercolors to collage some cards to send to them.  I have a pretty good collection of painted rice paper and handmade paper scraps to work from, so I didn't have to make any new collage pieces.


 Valuable scraps

As you can see, some of the pieces are even paper towels that I was previously using as a place to dab my brush between colors.  I saved them since they have such a random congregation of colors and an interesting texture, so they often come in useful.

Today I completed three cards, but I had the white balance off when I took pictures of them, so can only show you one of them right now ~ the least awful photo... the colors are still not true.  I'll post the pictures anew once I have a chance to rephotograph them all.

Hope to do so tomorrow, but it might not be possible as I'm going to be at Roadworks most of the day helping ink the plates for the steamroller.  It promises to be an exciting day so I'd better be off to bed now.  G'night!

... Update: 


Maybe too much red above?  I could tone it down a bit.


This one looks better in person ~ it's been tricky for me to photograph these. 

12 September 2010

tennis time


Played tennis over lunch last week with Michelle (pictured above!).  We are planning to play more often so we can get some exercise and hopefully improve our game along the way.  

As we left the court to rush back to work, tennis balls kept dropping behind us because we had them in a flimsy, plastic grocery bag.  Every time I picked one up, more would drop out!  I'm sure it was quite comic, but since I don't want to go through that every time we play, I decided to get her a bag for the balls.  And why not make a little graphic to personalize it, too?

Now that the illustration is done, I have to figure out the best way to put it on a bag.  I hope she likes it!

08 September 2010

from the garden


Our peach tree's boughs are heavy with ripe fruit and now it's a race between us and the squirrels as to who gets to eat them.  Our next-door-neighbor's giant tomatoes also ripen this time each year, so it was time for our annual exchange of garden bounty.


Yesterday evening I painted some of the harvest while watching a movie with my husband.   My models were very ripe and smelled so good while I was painting them.  I inked the tomatoes but not the peaches.

Today I printed them small and put them on blank note cards.  Now I have something to mail back to Miwako.

04 September 2010

mailbox treasure

Something lovely in the mail for me from my friend Miwako, who lives on the west coast of Tuscany.


The blues remind me of the sea and the patterns remind me of the little town where we met.  I shall have to make her a little artwork to send with my letter in reply.

28 August 2010

transformation

I was asked to create a presentation for the city of how an old, boxy building might be transformed into a Japanese community center.  The building was for sale and some community leaders had some great ideas for it.

Naturally, anything is possible in the digital world, though I still took budget into account.  It was fun to alter just a few elements to turn it into this:


The original is far less attractive ~ practically neighborhood blight ~ though I have to say that I met the people working there and they seemed very kind.


Nothing has happened yet on the actual transformation.  As far as I know, the building has not even been sold yet.  But it's nice to imagine that one day, there might be a new community center to dress up the neighborhood.

21 August 2010

levi's workshop

Almost as soon as they arrived, it seems they are closing!  When I heard that the Levi's Workshop was packing up and reappearing in New York, I hurried on over to get a glimpse of the action before they were gone forever.  And I'm glad I did, as there was so much goodness to behold.


Here on the zine wall I found a lot of inspiration for The Sketchbook Project.  These were really fun to read.


Artists were at work.


Supplies for the printer.


Drying racks.


Printed work on the walls.


I did a little stamping with some stamps designed by artists.  Admired mini-accordion books printed with poems and watched the printers at work.  Now I know that if I want to learn to use the press, I'll have to go to the San Francisco Center for the Book.

Good-bye Levi's Workshop ~ have fun in New York.